Showing posts with label Flash and JS. Show all posts

Friday, 6 April 2012

FluidGrid Flash image Gallery

A dynamic Flash-xml driven image gallery, fully customizable through javascript variables within the html.

DOWNLOAD
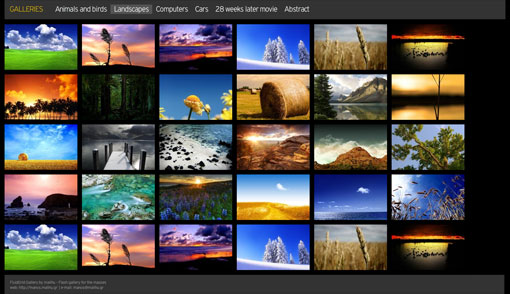
FluidGrid Gallery
Main features
  • XML driven
  • Configurable via the html document
  • Multiple galleries
  • Title and description for each image
  • Dynamic texts (footer)
  • All colors are configured via the html document
  • Preloaders for each image and thumbnail
  • Uses SWFObject to embed flash
Customization
Fancy horizontal animation on browser resize – values: “on” or “off”
browser_resize_animation = "on";
The directory of the image files (important: keep trailing slashes)
images_directory = "images/";
The total number of galleries
total_number_of_galleries = 8;
Galleries list
Format: “gallery_1″, “gallery_2″, “gallery_3″ etc. for your xml files
Format: “gallery_title_1″, “gallery_title_2″, “gallery_title_3″ etc. for the gallery title
gallery_1 = "xml/animals_birds.xml";
    gallery_title_1 = "Animals and birds";
gallery_2 = "xml/landscapes.xml";
    gallery_title_2 = "Landscapes";
gallery_3 = "xml/people.xml";
    gallery_title_3 = "People";
gallery_4 = "xml/abstract.xml";
    gallery_title_4 = "Abstract";
gallery_5 = "xml/cityscapes.xml";
    gallery_title_5 = "Cityscapes";
gallery_6 = "xml/computers_internet.xml";
    gallery_title_6 = "Computers and Internet";
gallery_7 = "xml/movies.xml";
    gallery_title_7 = "Movies";
gallery_8 = "xml/cars.xml";
    gallery_title_8 = "Cars";
Galleries title text
title_text = "GALLERIES";
Footer text (you can use some simple html tags like anchors, break lines etc.)
footer_text = "FluidGrid Gallery by malihu - Flash gallery for the masses web: <a href="http://manos.malihu.gr">http://manos.malihu.gr</a> | e-mail: <a onclick="javascript:pageTracker._trackPageview('/mailto/manos@malihu.gr');" href="mailto:manos@malihu.gr">manos@malihu.gr</a>";
Gallery styling
COLORS – format: 0×000000 (e.g. 0xffffff for white, 0xff0000 for red etc.)
page_background_color = "0x000000"; //document background hexadecimal color code
scrollbar_color = "0x666666"; //document scrollbar hexadecimal color code
menu_title_color = "0xffcc00"; //"Galleries" text hexadecimal color code
menu_background_color = "0x333333"; //menu background hexadecimal color code
menu_text_color = "0xffffff"; //galleries titles hexadecimal color code
menu_selected_color = "0x545454"; //selected gallery background hexadecimal color code
thumbnail_background_color = "0x333333"; //thumbnail background hexadecimal color code
image_background_color = "0x333333"; //large image background hexadecimal color code
thumbnail_border = "no"; //Change the borders of the thumbnails - values: "yes", "no" or "0-100" number which indicates opacity (e.g. "50" for 50% opacity of borders)
thumbnail_border_color = "0xffffff"; //thumbnail borders hexadecimal color code
thumbnail_title_color = "0x000000"; //thumbnail title hexadecimal color code
thumbnail_hover_color = "0xffcc00"; //thumbnail background hexadecimal color code on mouse over
image_preloader_color = "0x000000"; //preloader hexadecimal color code
tooltip_background_color = "0xffcc00"; //tooltip background hexadecimal color code
tooltip_text_color = "0x000000"; //tooltip text hexadecimal color code
exit_button_background_color = "0x000000"; //large image "X" button background hexadecimal color code
exit_button_x_color = "0xffffff"; //large image "X" button hexadecimal color code
footer_text_color = "0x999999"; //footer text hexadecimal color code
footer_background_color = "0x333333"; //footer background hexadecimal color code
In order to have the html/css background visible below flash, set wmode parameter and page_background_color values to “transparent”.
XML format
<myItem title="Image Title"
description="Image description"
img="thumbnail_image_filename.jpg"
img_large="large_image_filename.jpg"/>
The only thing to remember in order to use the FluidGrid Gallery is that the thumbnails size must be: 240×150 pixels and optimally the size of the large images should be analogous (ratio: 1.6) to thumbnails (e.g. 1920×1200, 1680×1050, 1280×800 etc.).

Flash background with html content

Set a flash fullscreen background with html content on top and customize it within html via SWFObject variables.

DOWNLOAD
Why a flash background? Because we can ;) and cause all those cool things flash does.
The code
Load the SWFObject that’ll embed the flash straight from Google
<script src="http://ajax.googleapis.com/ajax/libs/swfobject/2.2/swfobject.js" type="text/javascript"></script>
The css with some custom fonts via Google font API
@import url(http://fonts.googleapis.com/css?family=Josefin+Sans+Std+Light);
@import url(http://fonts.googleapis.com/css?family=Reenie+Beanie);
*{margin:0; padding:0; border:0;}
html,body{width:100%; height:100%;}
body{background:#000;}
#bg{position:fixed; left:0; top:0; z-index:1;}
#container{position:absolute; width:100%; height:100%; min-width:620px; z-index:2;}
#container .content{width:540px; color:#fff; margin:40px;}
#container .content h1{font-family:'Josefin Sans Std Light', arial, serif; font-size:48px;}
#container .content p{font-family:'Reenie Beanie', arial, serif; font-size:24px; margin:30px 0;}
#container .content p.alt{color:#000; background:#fff; padding:5px 10px;}
#container .content img{border:5px solid #fff;}
The markup
<!-- html content -->
<div id="container">
<div class="content">
<h1>This is html content placed above flash</h1>
Lorem ipsum dolor sit amet, consectetur adipiscing elit. In vulputate consequat massa, non ultrices enim aliquam vitae. Proin at ante ac nisl ultricies dignissim. Ut enim nunc, malesuada eu cursus sit amet, ultricies sit amet nunc. Aliquam rutrum mi nec eros cursus hendrerit.
        <img src="a_thumbnail.jpg" height="188" width="250">
<p class="alt">Sed dui turpis, accumsan ac porta nec, mollis venenatis mi. Integer eget elit turpis, non congue nulla. Nullam blandit iaculis diam, sit amet gravida sem tempor in.
</p></div>
</div>
<!-- flash background -->
<div id="bg">
<script type="text/javascript">
var flashvars = {
  myFile: "a_bg_img.jpg", //set the file URL that flash will load
  myFileType: "image", //set filetype (values: image, flash)
  loadEffect: "Fade" //set load effect - options: "Fade", "Wipe", "Iris", "PixelDissolve", "Photo"
};
var params = {
  id: "bg",
  name: "bg",
  wmode: "transparent",
  menu: "false"
};
var attributes = {
  id: "bg",
  name: "bg",
  wmode: "transparent",
  menu: "false"
};
swfobject.embedSWF("bg.swf", "bg", "100%", "100%", "10.0.45.2","expressInstall.swf", flashvars, params, attributes);
</script>
</div>
Note the 3 variables (“myFile”, “myFileType” and “loadEffect”) inside SWFObject script. You can set the file that’ll be loaded in flash (“myFile”), set its file-type (“myFileType”) with values “image” or “flash” accordingly and the loading effect by setting an option in “loadEffect” variable. The available options are:
  • “Fade” Fades in background
  • “Wipe” Reveals background with a diagonal mask
  • “Iris” Reveals background with a centered mask
  • “PixelDissolve” Reveals background in blocks
  • “Photo” Reveals background with a photographic-flash effect
For example, to load an image, you set its URL in “myFile” (e.g. myFile: “a_bg_img.jpg”) and set its filetype as “image” (myFileType: “image”). To load an external SWF, you set its URL in “myFile” (e.g. myFile: “a_bg_swf.swf”) and set its filetype as “flash” (myFileType: “flash”).
The actionscript (AS 2.0)
Stage.scaleMode = "noScale";
Stage.align = "TL";
import flash.display.*;
import mx.transitions.*;
import mx.transitions.easing.*;
preloader._x=Stage.width-preloader._width-25;
preloader._y=55;
function loadBitmapData(url:String, target:MovieClip) {
    var imgMC:MovieClip = target.createEmptyMovieClip("imgMC",target.getNextHighestDepth());
    var listener:Object = new Object();
    listener.tmc = target;
    listener.onLoadInit = function(mc:MovieClip) {
        mc._visible = false;
        if(myFileType=="image"){
            var bitmap:BitmapData = new BitmapData(mc._width, mc._height, true);
            this.tmc.attachBitmap(bitmap, this.tmc.getNextHighestDepth(),"auto", true);
            bitmap.draw(mc);
        } else {
            mc.loadMovie(myFile);
        }
        Fullscreen_bg();
        _quality="BEST"; //for best image quality set to "BEST", for better performance set to "HIGH"
        TransitionManager.start(preloader, {type:Fade, direction:Transition.OUT, duration:1, easing:None.easeInOut});
        if(loadEffect=="Fade"){
            TransitionManager.start(bg_mc, {type:Fade, direction:Transition.IN, duration:3, easing:None.easeInOut});
        } else if(loadEffect=="Wipe"){
            TransitionManager.start(bg_mc, {type:Wipe, direction:Transition.IN, duration:3, easing:Regular.easeInOut, startPoint:1});
        } else if(loadEffect=="Iris"){
            TransitionManager.start(bg_mc, {type:Iris, direction:Transition.IN, duration:3, easing:Regular.easeInOut, startPoint:0});
        } else if(loadEffect=="PixelDissolve"){
            TransitionManager.start(bg_mc, {type:PixelDissolve, direction:Transition.IN, duration:3, easing:Regular.easeInOut});
        } else if(loadEffect=="Photo"){
            TransitionManager.start(bg_mc, {type:Photo, direction:Transition.IN, duration:2, easing:Regular.easeOut});
        }
        sizeListener = new Object();
        sizeListener.onResize = function() {
            Fullscreen_bg();
        }
        Stage.addListener(sizeListener);
    };
    var loader:MovieClipLoader = new MovieClipLoader();
    loader.addListener(listener);
    loader.loadClip(url, imgMC);
}
createEmptyMovieClip("bg_mc", getNextHighestDepth());
bg_mc.createEmptyMovieClip("cont", bg_mc.getNextHighestDepth());
loadBitmapData(myFile, bg_mc.cont);
function Fullscreen_bg(){
    picHeight = new Object ();
    picHeight = bg_mc._height / bg_mc._width;
    picWidth = new Object ();
    picWidth = bg_mc._width / bg_mc._height;
    if ((Stage.height / Stage.width) < picHeight) {
        bg_mc._width = Stage.width;
        bg_mc._height = picHeight * bg_mc._width;
    } else {
        bg_mc._height = Stage.height;
        bg_mc._width = picWidth * bg_mc._height;
    };
    bg_mc._x = (Stage.width-bg_mc._width)/2;
    bg_mc._y = (Stage.height-bg_mc._height)/2;
}
That's about it. The zip file contains the source .fla so you can customize it as you like. Have fun!

Flash image slideshow

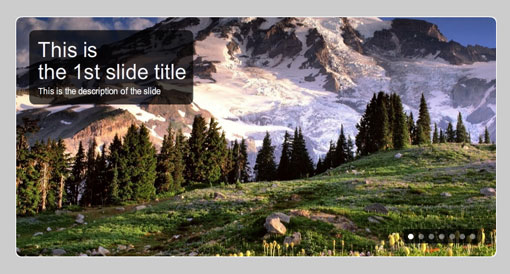
A highly customizable, xml-driven dynamic flash slideshow/banner rotator with simple navigation and auto-play feature.

DOWNLOAD
Flash image slideshow
Very easy to customize via SWFObject variables and XML attributes.
Features include:
  • Set slideshow dimensions via CSS without editing the .fla file)
  • Set the directory of the images and XML file through swfobject variable
  • Set transition types, time, speed etc. via swfobject variables
  • Customize slideshow appearance (images scaling, colors, borders, radius corners etc.) via swfobject variables
  • Customize each slide appearance (text color, background, border, radius corners etc.) through XML attributes
This flash slideshow utilizes GreenSock custom classes (files included in the download .zip)

Resize flash dynamically with javascript and actionscript

A simple and efficient way of dynamically resizing flash embedded objects with javascript and actionscript.


Ever wanted to change the dimensions of a flash movie on-the-fly without refreshing the page? If yes, read on!
The idea is to wrap your flash movie within a div and embed it with swfobject making its width and height 100%. Resizing the wrapper div with javascipt is very simple and can be done with a single jquery function in the html code. The same function can also be called from flash using a simple getURL action, resulting an easy way of accomplishing the goal of dynamically resizing flash movies.
The code
Firstly we need to insert our flash movie in the html using swfobject. In our example the flash movie is resized.swf. Inside the head tag insert:
<script src="http://ajax.googleapis.com/ajax/libs/swfobject/2.2/swfobject.js" type="text/javascript"></script>
<script type="text/javascript">
var flashvars = {
};
var params = {
  allowFullScreen: "true",
  menu: "false",
  wmode: "window"
};
var attributes = {
  id: "resized",
  name: "resized",
  wmode: "window"
};
swfobject.embedSWF("resized.swf", "resized", "100%", "100%", "10.0.0", "expressInstall.swf", flashvars, params, attributes);
</script>
Note that we’re giving the embedded swf a width and height of 100% and for some caching speed, we load the swfobect from Google.
We also need to load the jQuery that we’ll need for our javascript function later on. We load jQuery also from Google by inserting still inside head tag:
<script src="http://ajax.googleapis.com/ajax/libs/jquery/1.4/jquery.min.js" type="text/javascript"></script>
We now need some CSS for the wrapper div that’ll hold the flash movie and set its initial dimensions. For simplicity we’ve given it an id of resized.
#resized{width:550px; height:400px; margin:20px 40px;}
We insert the div in our markup and we also create a text link that we’ll use to call the jquery function.
<div id="resized"></div>
<div><a href="#" onclick="ResizeFlash('800','1200'); return false">Set width: 800px - height: 1200px</a></div>
In ResizeFlash function, the first number (800) corresponds to the new width (in pixels) we want our flash to change and the second (1200) to the new height. We can also use percentages (e.g. 90%) instead of pixel values and leaving any of the 2 parameters empty will result in only resizing one dimension. For instance writing ResizeFlash(”,’1200′) will set the height of flash to 1200px while leaving its width as it is.
So know we need to insert the actual javascript function that’ll do the trick of resizing the div holder. At the very end of our document, right before the closing body tag insert:
<script>
function ResizeFlash(newWidth,newHeight){
    if(newWidth){
        $("#resized").css("width",newWidth);
    }
    if(newHeight){
        $("#resized").css("height",newHeight);
    }
}
</script>
The function checks if width and height parameters are set and if they are, gets their values and applies a new CSS style to the div.
The Flash (Actionscript 2.0)
Calling the function from within the flash is very easy with the use of the getURL action. So create the movie with flash and give it the name resized. Create a new button and give it an instance name of btn1. Then make an onRelease function in a frame in timeline and insert “javascript:ResizeFlash(”,’1000′);” as the URL inside the getURL action:
btn1.onRelease=function(){
    getURL("javascript:ResizeFlash('','1000');");
}
The button when clicked will set the flash movie height to 1000 pixels. You can see that we call the javascript function and set its parameters exactly like we do in html text links. Export the movie as resized.swf and you’re done ;)
Note that in order to see the result, you need to upload your files on your server. if you wanna check it locally, you’ll need to change the flash player security settings (right-click swf, select “Global Settings…”).